WebM and the things WordPress was hiding from me.
Originally, I was going to an article on just WebM and the advantages it gives me in WordPress. But as I looked at the logs on my server and WordPress still has a lot of work to do on their video insertion plugin.
Introduction.
When I built my first web-page back in 1998. There wasn't much of a standard in terms of web-streaming video much less a variant of WebM. Partially because the whole notion of having streaming content on your website in the age of dial-up modems was one of those unheard of things. If you wanted a video you download it to your hard-drive and play it with a dedicated player. That's it!
Web Progression through streaming.
Over time companies like Apple QuickTime and DivX started to provide options for people to host video content on their websites while YouTube was off being it's own entity establishing web 2.0 during y2k. It was at this time I started to release some videos of my 3-d modeling in .MPEG or .mpg format. The reason why is .mpg could be played on virtually any computer, even an Amiga with a 68020 20mhz processor (at about 4-8fps but still played!) mpg did come at a price and I'll get to that in a bit.
Example 1st gen M-Peg Video:
ukidig.mpg - This video was encoded using the same utility that I used on my website years ago. This is StepMania Character Ukidig . It's 1:05 minutes , 320x240 in resolution 24fps and a horrific 10.7MB in size! Now since there's animated backgrounds going that will affect its compression a little. But still, Ouch! Click here to view this antique.
Conversion from blog to v-blog.
Now that I'm on WordPress I realized that maybe I wasn't using my website to its fullest potential. Especially for a lot of the guides I have online . So I tried all of the ways to present video inside of WordPress. Before settling/giving up and sticking with the default WordPress video player which is pretty good all on its own. I tried just about every player that the WordPress plugin database has to offer. They were ether non-responsive (such as they do not shrink down on a cell-phone screen breaking my CSS along the way) they were so script heavy that I was getting errors non-stop using them. Other video player plugins were useless as they relied on older methods of playing videos onto a website such as flash. We're in the age where flash is used for the animation industry and that's it. It's not longer apart of integral web functionality since HTML5 replaced all of that for us.
The current web video codecs:
Lets talk about the codecs out there that can be used for website work. Going through the most common codecs that are used.
.webm codec:
The WebM codec at the time of this posting is considered the newest kid on the block. Funded by Google to help with establishing a new open source codec that can be used on the web like what HTML5 did to Adobe Flash the WebM codec is slowly being adopted into mobile phones and internet browsers as a newer standard to play video. There is value in WebM right away because it allows a blogger to not just host video. But host high quality 1080p 60fps video at the fraction of the bandwidth then any other codec online could possible offer. Google is viewing this new codec in the same light as 4k video is here. It's being filmed with GoPro 4 cameras and uploaded to YouTube. And 4k video underneath the current codec formats must be incredibly taxing on the YouTube servers.
Example Video:
Ukidig.webm - This video is the newest WebM VP9 Codec with a variable bitrate of 1Mbs . Length is 1:05 minutes, 1920x1080 resolution at 60fps . Total file-size is 8.9MB!
.mp4 codec:
The mpeg-4 or mp4 codec has become to the most standardized codec for web-streaming and transmission. HTML5 video players love it. During the start of the smartphone war it was used as the defacto standard for video as they can rely on a chip to do all of the heavy lifting inside of the phone in regards to compression. And with a high enough bit-rate it can be very scale-able. The downside of the mp4 standard is in order for you to encode with it a license has to be paid somewhere. Either by the hardware manufacturer or by you when you purchase a professional video editing license. So in order to actually encode with MPEG you must pay for MPEG. Which set a lot of the video streaming development back for a while.
Example Video within mpeg-4:
There is two I must show you.
Master file:
Ukidig-HD.mp4 - This video was recorded with MP4 in adobe premiere using the .h264 format using the HD1080P 29.97 preset customized to 60fps instead of 29.97. Variable 2-pass Bit-Rate with a target bitrate of 32Mbs and a Maximum of 40Mbs which is the functional equivalent of Blu-ray encoding. Just as a note, this is the master file used for all encoding tests in this blog and due to its size it may take a very long time to load! File size of this is 254MB for 1:05 minutes of footage.
Web file:
Ukidig.mp4 -This video is what you see on the website as the fallback for the Ukidig Stepmania character in the event the browser is incapable of viewing WebM. This too was encoded in adobe premiere using the .h264 format using the HD1080P 29.97 preset customized to 60fps instead of 29.97. Variable 2-pass Bit-Rate with a target bit-rate of 1Mbs and a Maximum of 2.5Mbs. File-size is 16.8MB.
.ogv Codec:
The Ogg Video Codec was introduced in the mid 2000's and was one of the first codecs to come out as an alternative to the commercial encoding methods for both video editing and web-site work and design. Since it is one of the older ones browsers can still support it to this day however not many people use this codec anymore as more efficient codecs such as .mp4 and .WebM has now been introduced rendering this codec as a fall-back in case the others failed on a particular browser.
Example Video:
Ukidig.ogv - Is the last line of defense of mp4 and WebM fail to load for the browser when displaying the Ukidig Stepmania character . This was encoded with a program called XMediaRecode using a variable bit-rate of 4Mb/sec as 1Mb/sec was too terrible! Another encoder had to be used as the OGV plugins for Adobe premiere did not work and did not give me an option to export the timeline to this desired format. File-size is 33.5MB
.flv Codec:
The "Flash Video Codec" will not be talked a whole lot on this blog as it was the video container that was used for flash video players. The flash video codec was the foundation of streaming media and what YouTube, New Grounds, and many other sites built their base around as a means to stream data to all browsers. It is slowly being phased out as better codecs and the push for more public licenses instead of paying money to Adobe become relevant in the late 2000's. This site is walking away from flash products except for maybe animation. So this codec is irrelevant.
Example Video:
Ukidig.flv - This video would be what the Ukidig Stepmania character would look like if the website still used Adobe Flash for its default player. Media was encoded using Adobe Premiere using the FLV format and the HD1080p preset customized for 2-pass variable bit-rate encoding around 5.4Mbs with a low-target around 20 percent and a high target around 80 percent. File size of this FLV is a terrifying 185MB so it may take a while for you to download and see it!
Uploading a video to WordPress.
WordPress made uploading a video as easy as possible into a blog article by simply click on the ![]() Add Media button and selecting the webm or mp4 file that you wish to upload.
Add Media button and selecting the webm or mp4 file that you wish to upload.  From here you can simply choose the video you wish to insert. Update the Captions to inform the viewers as to what they are watching and press the Insert post button and that's really all you can do! However, something strange happens in the background of WordPress that it never really tells you. That you have to check the log files on your server to really catch what is going on.
  Checking C-Panel on the web-host provider and went into AWStats. Scrolling down I wanted to pull the report on the 400 errors (typically 400 errors are where the server can't find certain files on your website.) Much to our surprise the WordPress video player script looks for fallback codecs such as .mpg and .ogv whenever you upload a .webm video. Also, the jpg of the same file-name is what the video is supposed to theoretically use as a title screen before the video file even starts up just like on YouTube.
 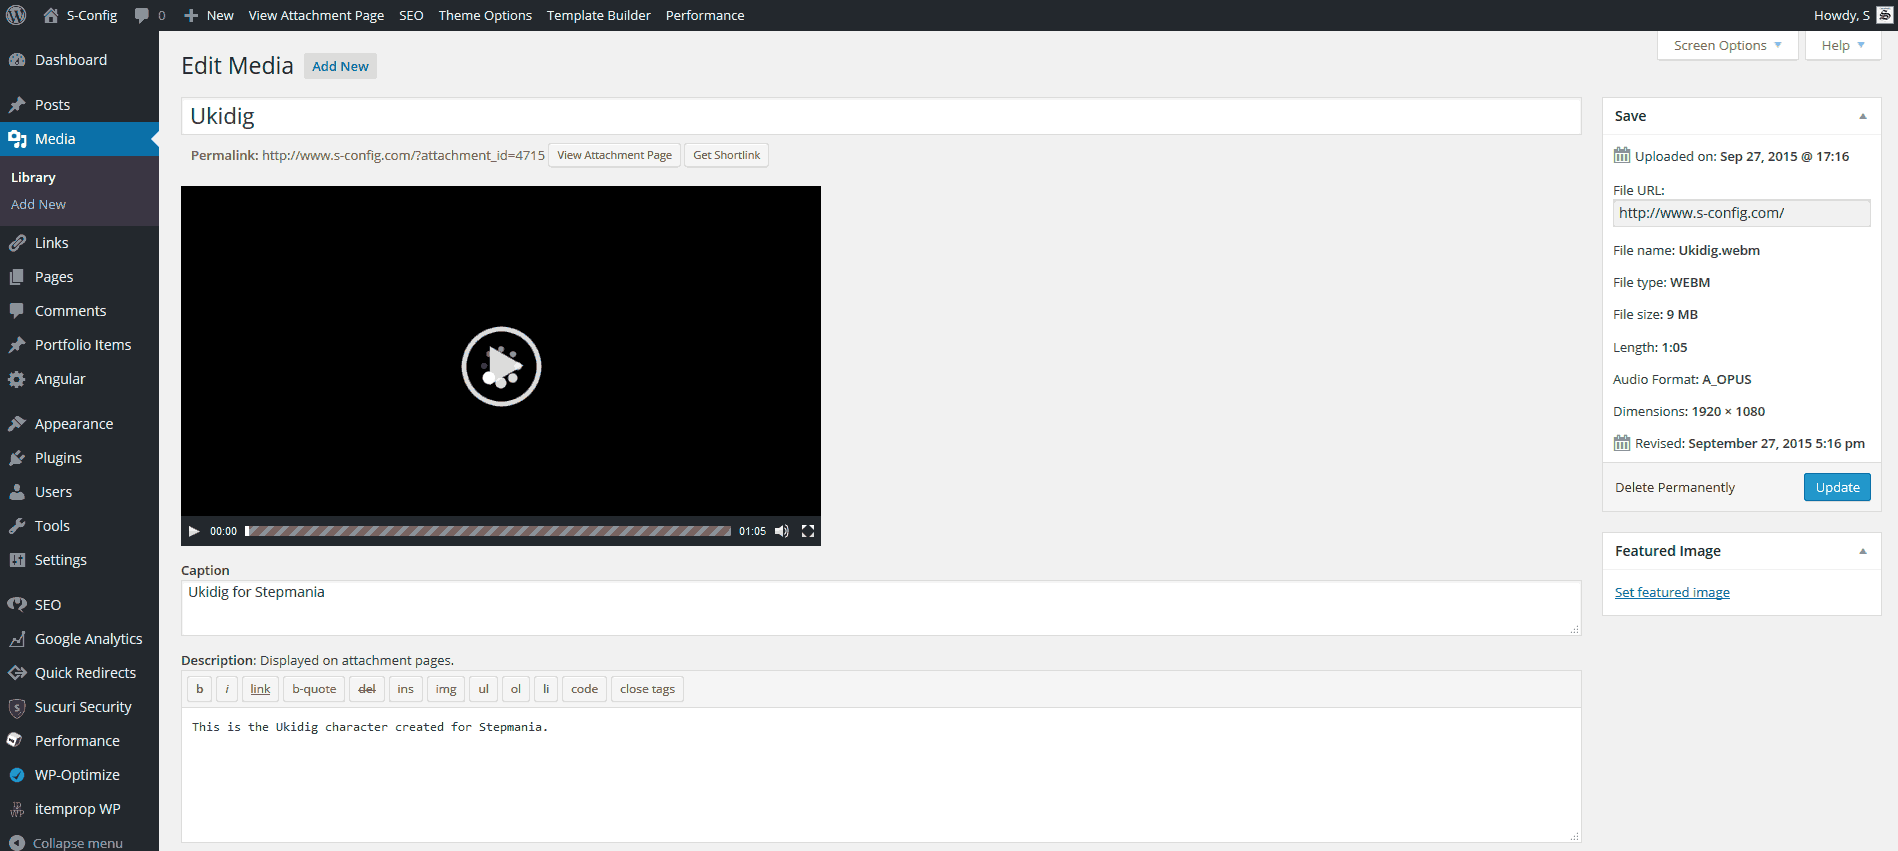 However, when you go into Media and Library, and select the WebM file that you just uploaded. Although you can set a featured image. You can't set any paths as to where the fallback video codecs are. This makes the Edit Media function in WordPress a little incomplete.
The work-around in WordPress.
 The work around for this until the WordPress people update the Media Upload-er tool with all of the features that are already there into the backend GUI is to simply go into Media and Add New and then you can batch upload all of the following:
- The WebM file which will be the forefront on your attachments.
- The MP4 which is the backup.
- The OGV which is the last resort.
- A JPG with the same name as the video to act as the title-page/poster image.
If you upload all four of these types of files to your WordPress the 404 errors. In AWStats will go away. Of course this means carrying a lot more files on your account and potentially transmitting a lot more data. Also, if you don't mind the 404 errors on OGV. You can probably get rid of that as most modern tech can handle WebM and MP4 without issue.
 Tell WordPress to use WebM files first!
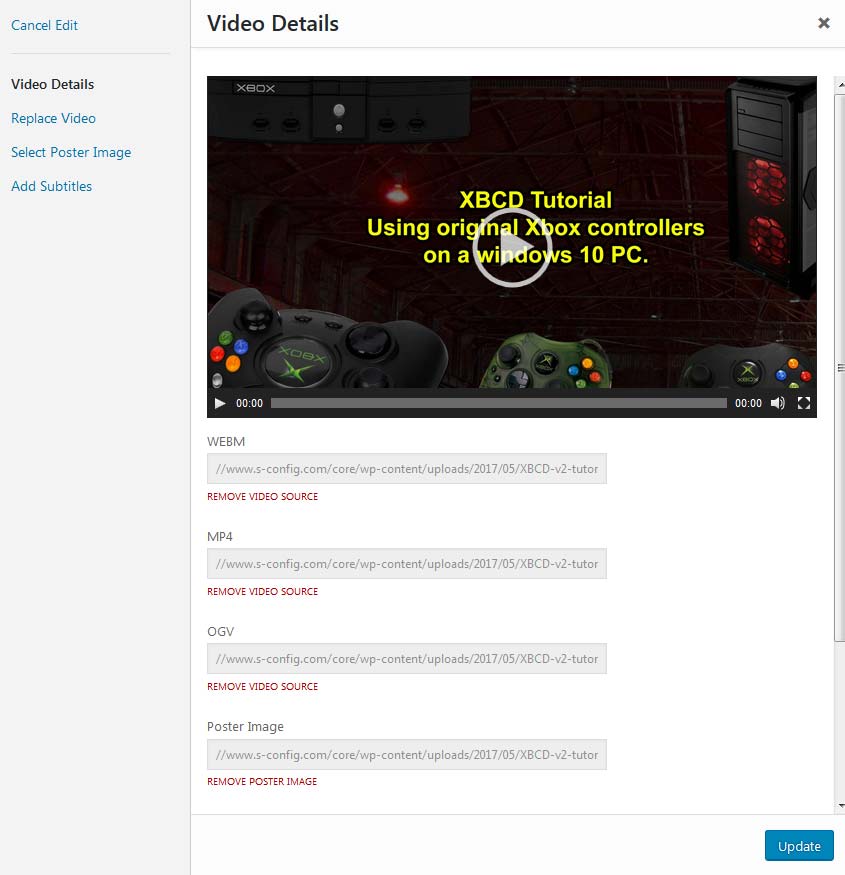 Update 2/18/2017 - This process is now more streamlined in later versions of WordPress allowing you to choose fallback videos and even setting posters. But for some reason WordPress will reach for an MP4 instead of a WebM file. To fix that click on the blog entry above!
The 150MB limit of WordPress:
WordPress has a 150MB limit on any file that you upload. This is actually due to a limitation of PHP upload more-so then a limitation of WordPress. This may make it impossible to upload this way for webm or mp4's that are very long. (Provided that you have a very generous download band on your web-server). The work-around is to upload a stub. basically tell premiere to make a small 1 second video. Then using either the File Manager in C-Panel or better yet if you have access to your account via SSH or FTP. Login and replace that stub movie file with your ultra-long one navigating the paths in your /wp-uploads/ section.
Encoding source material over to WebM, Ogv, and MPEG-4.
Although this isn't a detailed guide on how to convert videos. I'll give a crash course on how I've done it as long you fully understand that at the time of his blog posting we are currently at Adobe Premiere CS6 and XMediaRecode3261 and your mileage may vary with earlier and/or later versions of said programs.
Update 10/23/2017 - Old post warning!
I don't bother to do it this way anymore as the WebM codec for Adobe Premiere produced unstable video and there was a general lack of control with how videos were compressed. This guy especially bad when we had to do batch upload videos to the blog. We now use FFMpeg to perform all video transcoding from the master file. You may read on if you wish but everything below is kept only for archival purposes.
MP4's in Adobe Premiere:
This blog will assume that you know how to setup your presets for your project and that you have already edited and rendered your timeline and that you are ready for export. 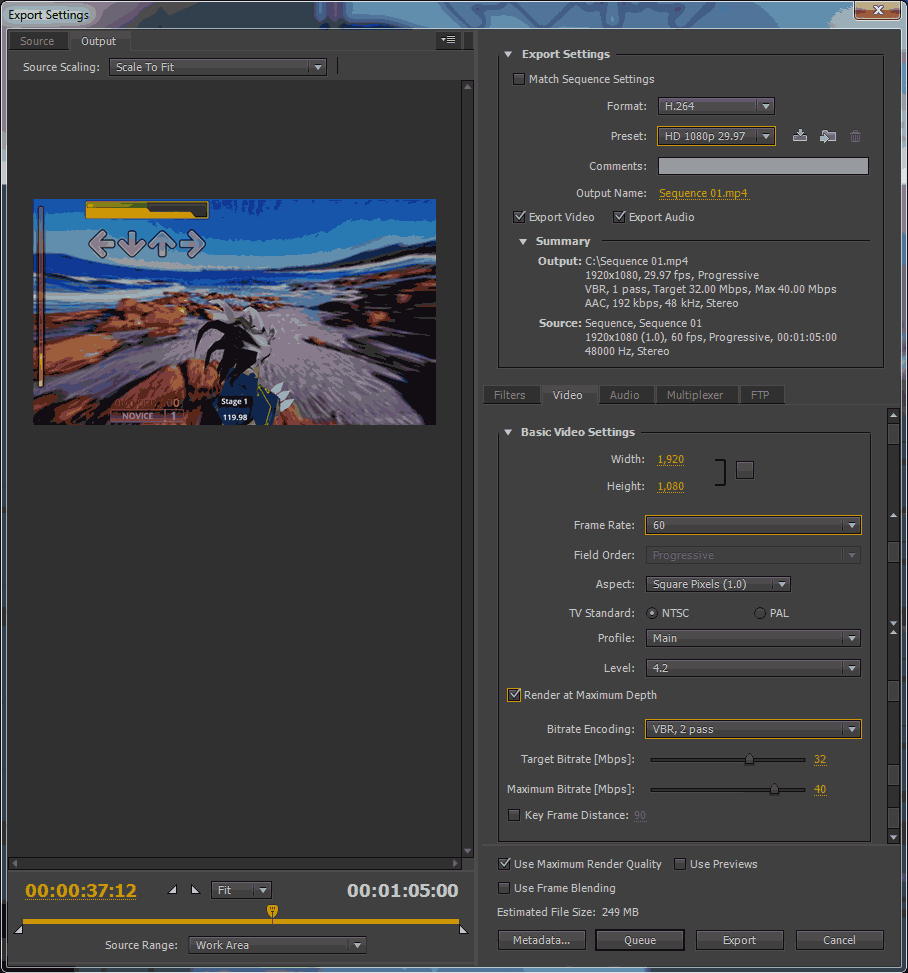 For your master MP4, that is the one you want to preserve for future conversion. Do a File, Export, Media and then change the format to H.264. Change the Preset to HD 1080p 29.97fps. Don't worry about the frames that will change in a moment. We choose this preset because the majority of other presets will not allow you to change frame-rate. Click on the video tab and set the frame rate to 60 the preset will then change to custom which is fine. Check the box to "Render at Maximum Depth" and change Bitrate Encoding to "VBR, 2 pass" finally, check the box near the bottom to "Use Maximum Render Quality." Place it into Queue so that you can render multiples of this file under different codecs, or export if you are only exporting one codec.
 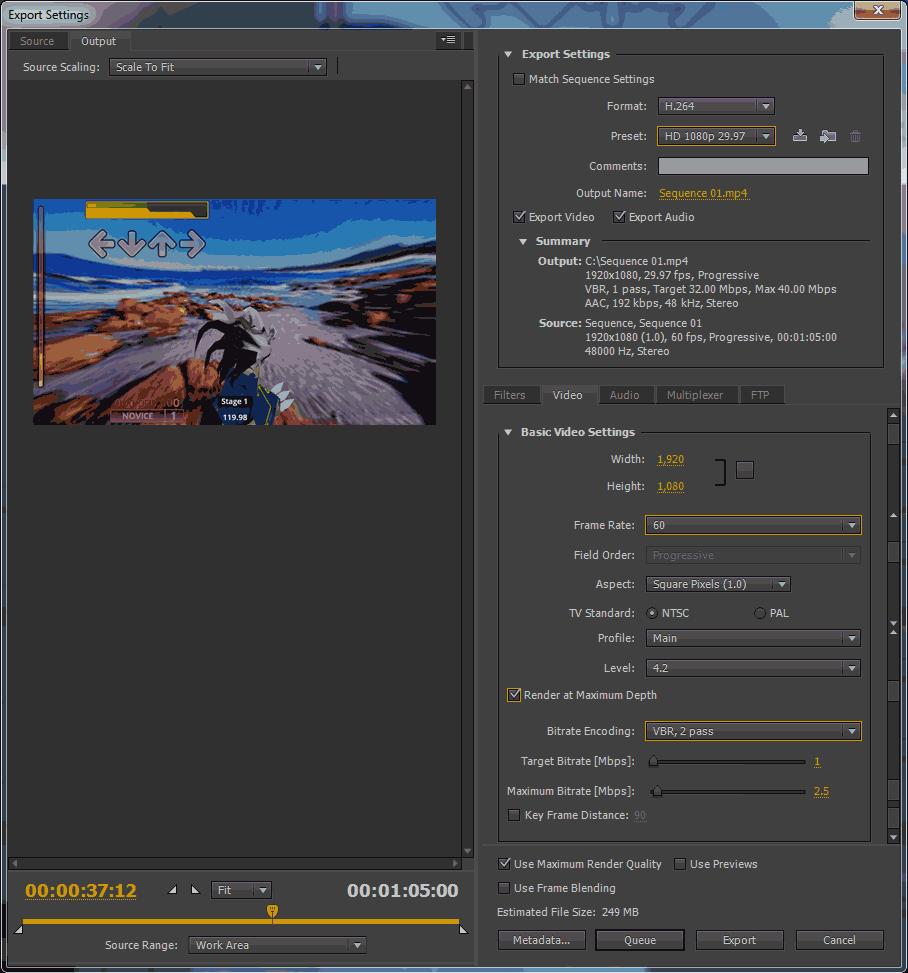 When you save your MP4 for web-streaming. Everything is identical except for the bit rate that we will be encoding at. Change the Target Bit rate to 1 and the Maximum Bit rate to 2.5 . If it artifacts out on you too much you can always set it a little higher. Ignore the Estimate File Size at the bottom as that is calculating based off of the last preset we selected. Place it into Queue so that you can render multiples of this file under different codecs, or export if you are only exporting one codec.
WebM's in Adobe Premiere:
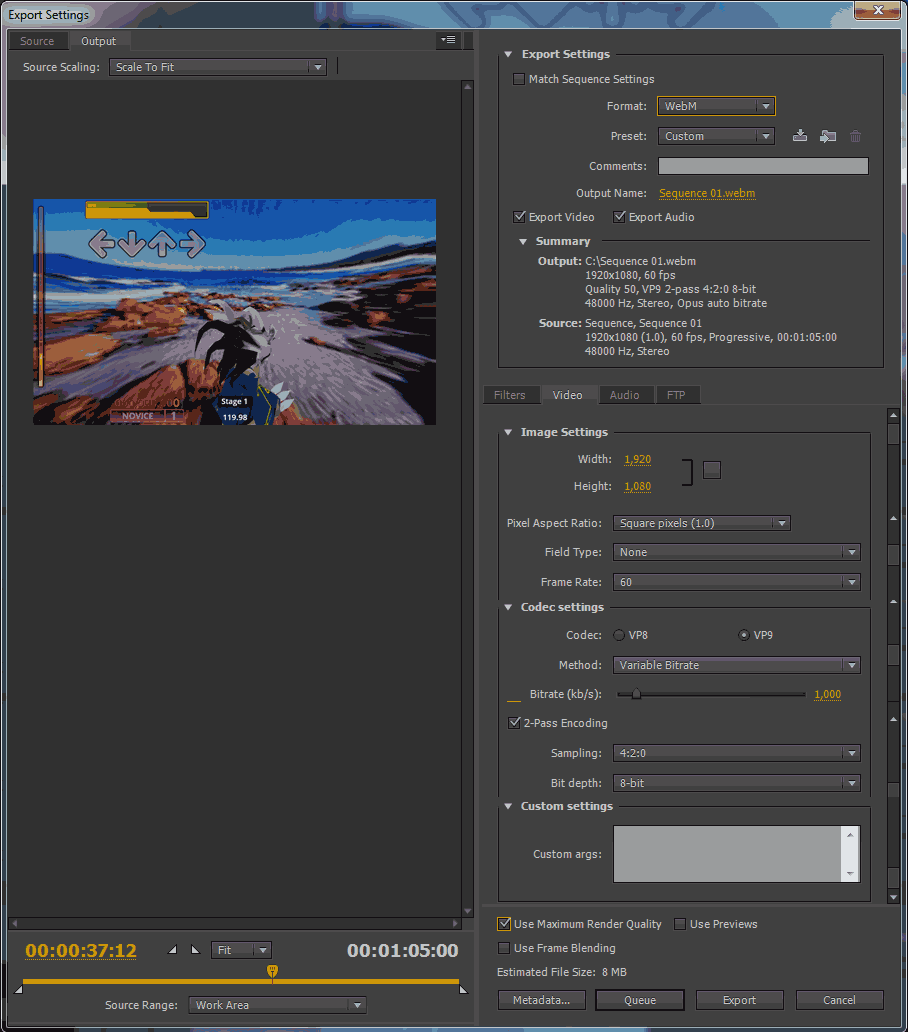 WebM is actually a lot simpler to setup in Adobe Premiere then MP4 was! Set your format to WebM. The custom preset will auto populate and then you go into the video tab change your codec settings to VP9 and your method to "Variable Bitrate" 1000kbs will be automatically set which is fine. Check "2-Pass Encoding" if it is not already checked and finally check the box for "Use Maximum Render Quality." Place it into Queue so that you can render multiples of this file under different codecs, or export if you are only exporting one codec.
OGV's in XMediaRecode
Because it's an older codec the plugins for Adobe Premiere failed on me in CS6. They simply didn't load. Plugins can be found at this GitHub. If you know how to make them work I would be interested in hearing. But for now we will continue to use XMediaRecode. Just a note that this program can also do WebM files as well and it's free of charge versus Premiere which I was lucky enough to get a student copy and even then it was a few hundred. 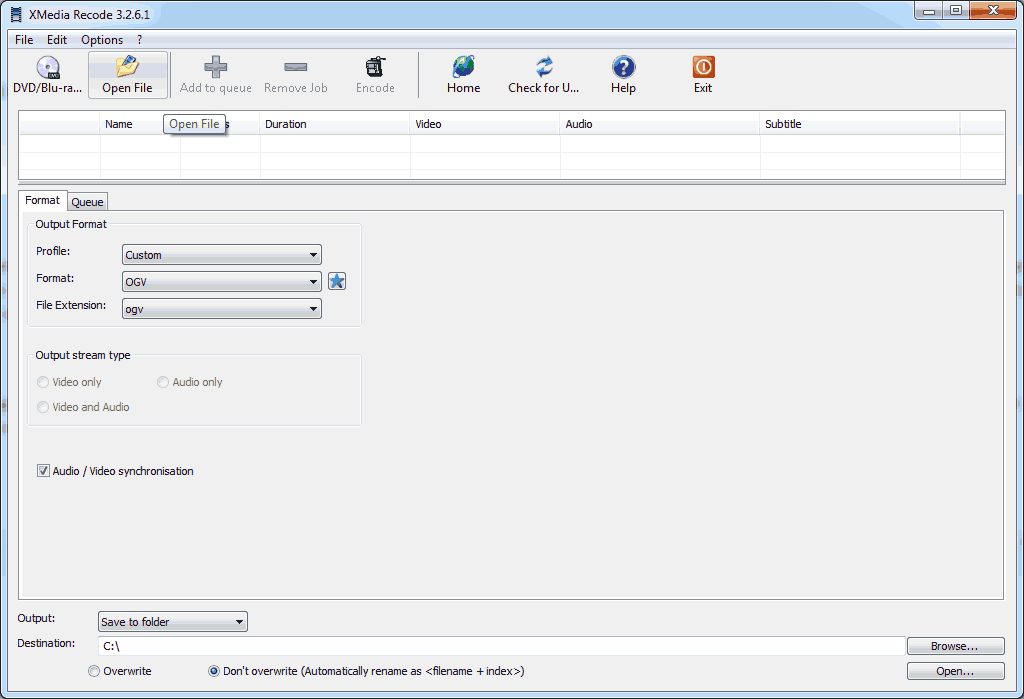 We're going to open file.
 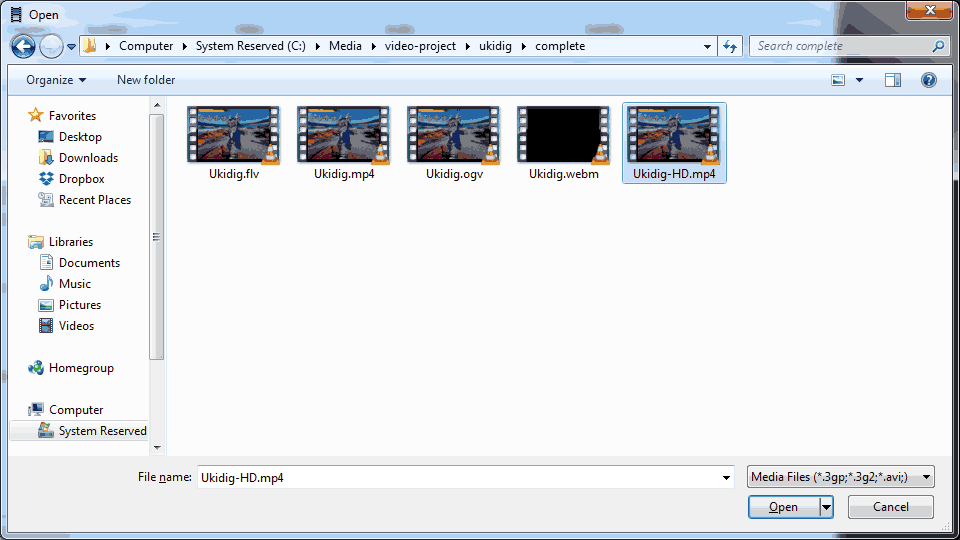 Then we are going to choose our highest quality file which is the master MP4 that we just generated. Select the file and Click Open to continue.
  Select your format tab and under output format make sure your format is set for OGV once you have loaded your master MP4 or AVI file.
 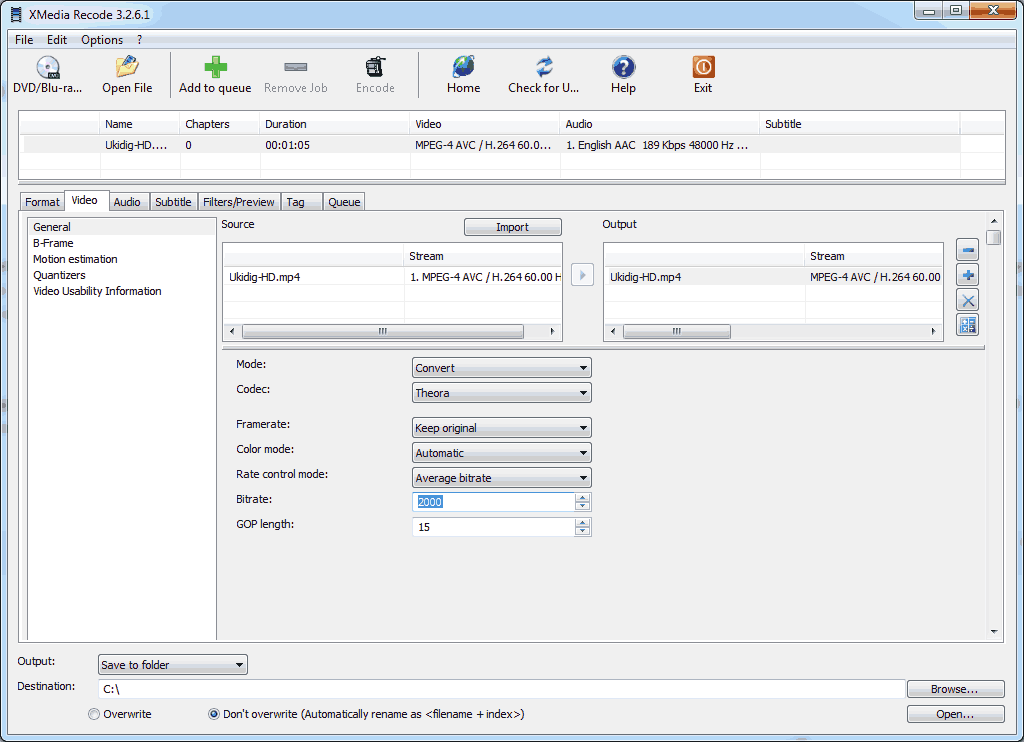 In the video tab we are going to select rate control mode and have it set for "Average bitrate". That is the equivalent of variable bitrate. Then see the bitrate to 4000kbs (you can set it really low down to 1000kbs, but at 1080p fps it looks terrible! 2000kbs is acceptable for desktop tutorials that do not have a lot of motion.)
 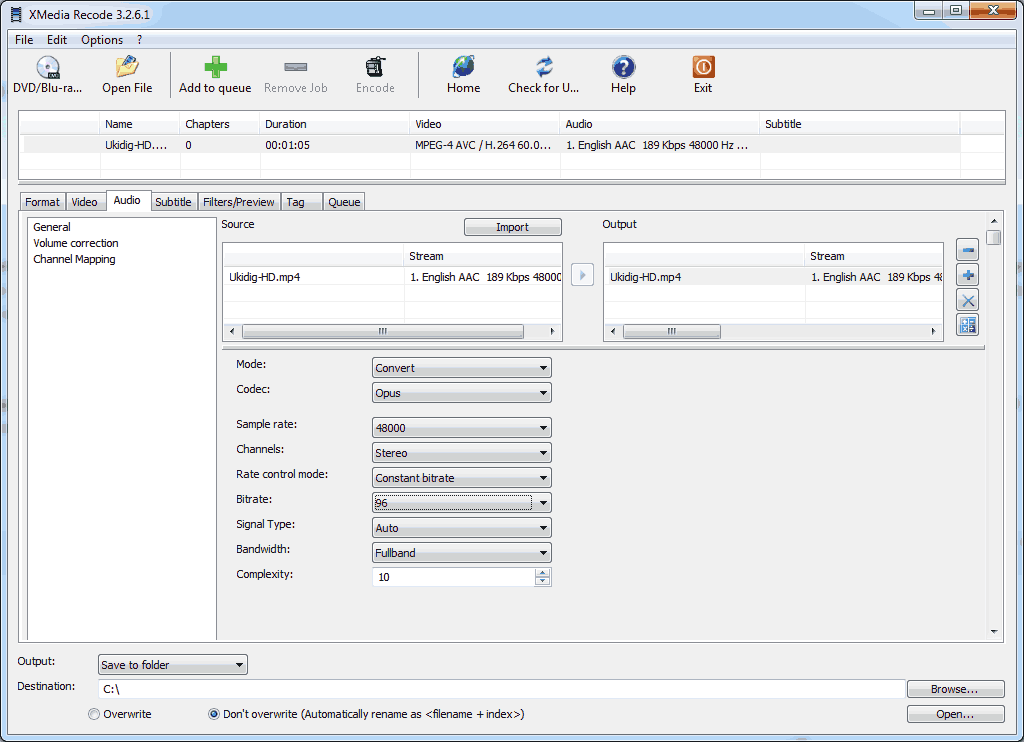 This is completely optional. But if you want to play with your audio bit-rate settings to get better quality. Or to save space if it's just talking. an ogg 96kbs sounds almost as good as a mp3 128kbs. So by default it is left at 96kps for our projects.
 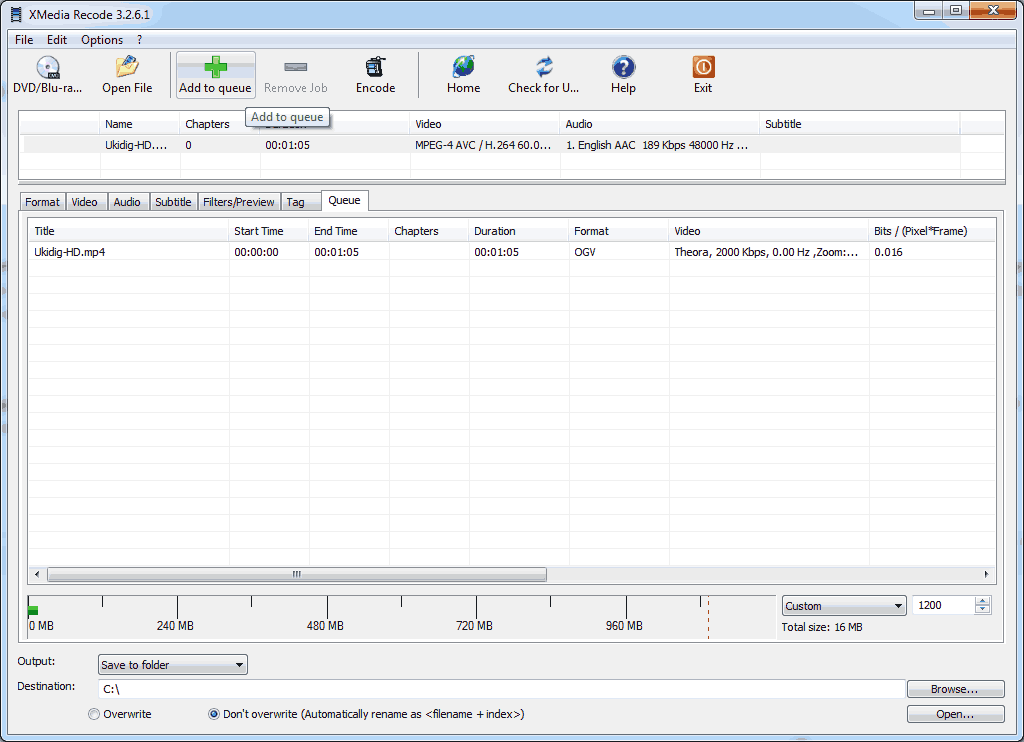 Click on the "Add to queue" button and also click on the Queue tab to verify your project is saved and ready to be encoded. Verify your destination folder that you want your new OGV to drop into at the bottom. Finally, Press the Encode button at the top of the program to begin. Or, select more projects to queue up so you can encode a batch of them at the same time.
 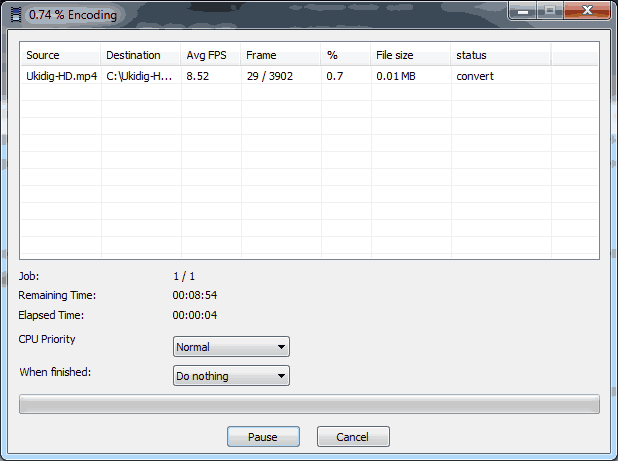 Once complete it will produce your OGV file ready to be uploaded up onto your site.
Security problems with OGV files.
 Update 01/15/2017 - OGV files for some reason have been blocked from the latest WordPress update from uploading properly. This is not the end of the world as all you have to do is add one line into the wp-config.php file:
define('ALLOW_UNFILTERED_UPLOADS',true);
which will allow you to upload OGV files again. If for some reason that does not work. You may have to contact your web hosting provider as they may not have defined OGV as a valid MimeType within the Apache daemon.
Final Thoughts on WebM
Although many problems exist within WebM such as Apple not supporting WebM on Iphones and Safari. Also if played via VLC on an Iphone it glitches out hard-core. As well as lock-ups in Firefox. These newer codecs will be desperately needed for the future of video blogging. To deliver high definition files at a fraction of the space to not only keep buffering issues to a minimum. But to continue the fight against web 2.0 encroachment and to also gain data independence. It's unfortunate that commercial software like Adobe premiere can't produce a good quality MP4 file like FFMpeg can accomplish. But it's to be expected. People in the open source community are constantly finding ways to improve the publicly licensed codecs while corporations simply let them sit as it costs millions in research to update. We will be using FFMpeg for all of our web-streaming needs here at S-Config.Com. It may be a little nerdy to pass all of those commands. But it's all about the results at the end of the day. I hope you found this article useful and thank you for reading.
That's what server said,
END OF LINE+++



This was greatly helpful. Thanks for publishing this
Glad it helped. take care and thank you for visiting this blog.
SWF is an Adobe Flash file format used for multimedia, vector graphics it is small web format SWF is used for adobe flash player to play videos Gifts etc Programmers can generate SWF files from within several Adobe products, including Flash ,flash builder you can clic-
No Jack,
SWF's are no longer used for the web because of the dangers to security. Oh, and it's called Adobe Animate now. Not Flash.
Thanks so much for the post.Much thanks again. Really Cool.
GOOD POST
A******e Video Converter can Convert OGV to MP4, OGV to AVI, OGV to WMV, OGV to MOV, OGV to MKV,OGV to AVCHD, OGV to FLV, OGV to MPEG, etc.
A shame. I thought someone would mention handbrake. But instead, I get Avdshare which is a paid app that is horrid at transcoding. Thanks but no thanks.
I highly recommend use Avdshare Video Converter to convert OGV to AVI, MOV, MP4, WMV, MPG, DV, Prores, VOB, SWF, FLV etc.
Great tutorial. Was looking for simple solution.